Sunday, May 20, 2012

The “Exquisite Doodle” Artist Project, Post 7

by Alex Mitchell

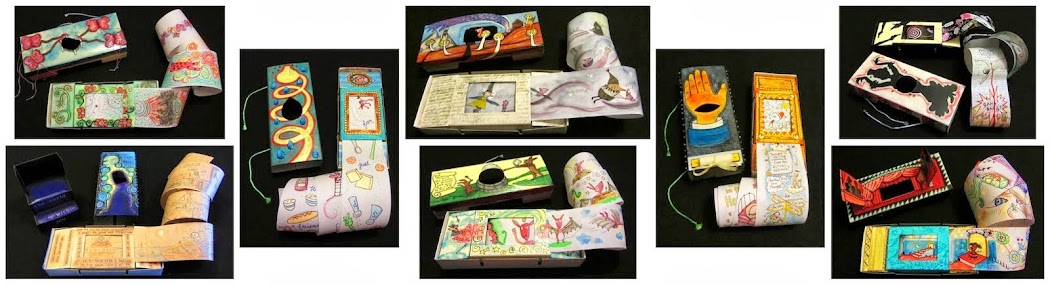
Remember how in my first post, I told you that this blog is your front row seat to the “Exquisite Doodle” Artist Project?  Well, things are getting more interesting all the time.

Assembly of eight “Exquisite Doodle” boxes for the players is officially in progress!  I’m using spray paints and templates to start things off…

The box fillers and scroll box covers have been spray-painted white.  It’s a fast and easy way to get a base coat done.  Make sure to ventilate if you do this!
To help me compose what I want to paint on the fronts of the large covers, I’ve cut cardboard templates.  Spray paint and templates belong together like peanut butter and jelly.  It takes a little time to cut out your template, but the spray paint eternalizes your design in seconds.  It’s so much fun!
The fronts of the large covers got a base coat of black spray paint and then with the templates in place, another coat of paint - this time white.  You can see the results above.  Next up:  Thinking about adding colors and what shapes to give my windows - I'll need one in the center of each cover to see through to the scroll that will be inside.  Just like what I came up with for the box featured at the top of this post!

Thursday, May 10, 2012

The “Exquisite Doodle” Artist Project, Post 6

by Alex Mitchell (From Spain, your "Exquisite Doodle" blog contributor)

Introducing The Players:
From Denmark, the pop-up queen par excellence, Kristine Suhr.
You'll love this short video of one of her pop-up books.
(photo of "Tea for Two,” ©Kristine Suhr)

From the US (Atlanta, GA), the design and illustration goddess,
Paula Joerling.
You'll find these beautiful paper dresses on her etsy shop.
(photo of “Julia,” ©Paula Joerling)

From the US (Tigard, OR), the delightful teller of pictorial tales, Lisa Kaser.
You can also see Lisa's work on her etsy shop.
(photo of “Starry Night Sojourn,” ©Lisa Kaser)

From the UK, the automata superhero, Keith Newstead.
You'll relish Keith's amazing sculptures on his website and blog.
(photo of “The Devil Rides Out,” ©Keith Newstead)

From the US (Atlanta, GA), the mechanical poet and storyteller, Tom Haney.
You'll love Tom's awesome blog with pics of his automata sculptures in the making.
(photo of “Dreamtime,” ©Tom Haney)

From Australia, the wonderful wizard of illustration, Bob Seal.
You can get to know Bob and see his work on Facebook.
(photo of “Bughouse,” ©Bob Seal)

From the US (Wrightwood, CA), the visionary, John Frame.
You'll want to find out about his incredible film project
“The Tale of the Crippled Boy.”
(photo of “Pip and the Bed,” ©John Frame)

If you live near Portland, don't miss John's show at the Portland Art Museum until May 27th.

Sunday, May 6, 2012

The “Exquisite Doodle” Artist Project, Post 5

Materials needed from previous posts:
-the large matchbox and its cover
-the scroll box and its cover
-the two box fillers
-the scroll

In addition:  scissors, tape, a ruler, and a pencil.

This is the last “construction” post.  In the two previous posts we made the scroll and the box fillers that go on either side of the scroll box.  We still need to cut slots and finish our covers.
Now that we’ve made the scroll, we need to be able to insert it into the scroll box.  Cut slots just wide enough for the scroll sticks along the top and bottom of the scroll box as shown.  We want a snug fit.

Since the scroll box sits in the center of the large matchbox, we need to cut identical slots in the large matchbox.  Place the scroll box with one box filler on each side inside the large matchbox.  Using the scroll box slots as guides, mark the large matchbox and cut the slots.  Insert the scroll and make sure the slots of both boxes line up.
Lay the cover of the scroll box face down.  Place the scroll box face down on top as shown.  Using the slots as reference, draw cutting guidelines on the backside of the cover as shown.  We need to cut out the part of the cover that would obstruct the scroll sticks.  In this case, we will remove four pieces of the cover along the edges.  With the cover in place over the scroll box as shown, you can see that two holes for the scroll sticks remain open.
Repeat this same procedure for the cover of the large matchbox, and cut the cover as shown.  Again, we need to cut out the part of the cover that would obstruct the scroll sticks.  In this case, we will remove two pieces of the cover from the center.  With the cover in place over the large matchbox as shown, you can see that two holes for the scroll sticks remain open.
In order to see the scroll when inside the scroll box with the cover on, we need to cut a window on the front of the cover.  The same thing is true for the front of the cover of the large matchbox - we need to cut a window here as well.  I’ve chosen to make it a circle window as shown.

We can keep our “Exquisite Doodle” box closed by placing tape on the backside of the large cover.  We can see the scroll through the window and use the handles to move it back and forth.  What we paint on the front of this large cover will play off of what we see of our scroll through the window.  Coming up soon are ideas for how to paint the covers.  But first I will introduce to you the wonderful artists playing the “Exquisite Doodle” Artist Project!  Stay tuned!

Wednesday, May 2, 2012

The “Exquisite Doodle” Artist Project, Post 4


Materials needed from last time:
-the large matchbox
-the scroll box
-the two small covers remaining
-the two lollipop sticks

In addition:  2 paper clips, thin paper, scissors, tape, and pliers.

Cut a long strip of thin paper that will fit inside the scroll box as shown.  It should be roughly ten times longer than your scroll box.   Tape together several strips if you need to.  This is your SCROLL.

Unbend and re-bend the two paper clips as shown.  These are your scroll HANDLES.  One end of the paper clip should insert tightly into the lollipop stick.  You may need pliers to squeeze the clip to make it fit.  The protruding end of the clip can now be used as a handle.  Do this for both lollipop sticks.
Tape one lollipop stick to one end of the scroll as shown.  First, tape along the length of the stick to fasten it to the paper.  Then tightly roll the scroll on itself around the stick, and put tape to hold this position.  Keep rolling the paper until you get to the other end of the scroll.  Tape the second lollipop stick to this end and roll the paper the same way as before.
Gather the large matchbox, the scroll box, and the two small covers remaining from last time.  The covers will need to go inside the large matchbox, one on either side of the scroll box. These are your box FILLERS.  First, cut to shorten them so that they fit inside the large matchbox.  Next, fold them down as shown because they are too wide.  If you place the scroll box in the center of the large matchbox, you can see how wide the box fillers must be on either side of it.  Use this width to guide you in creating one fold at the top and one at the bottom as shown.  Then wrap the folds around themselves to create the new box filler shape.